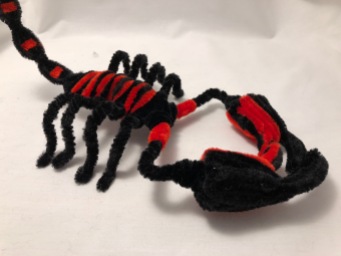
- Start by creating the legs. They will be created in pairs by folding 2 black pipe cleaners in half. Then put them together with the rounded edge out and leave a little bit of extra space at each end. Twist them together. Create 4 of these pairs of legs.
- Take one pair of legs and twist a pipe cleaner around the center of it. Line up one more pipe cleaner next to it and twist again. Complete this for all 4 pairs of legs, making sure to keep them parallel to each other as you go.
- Add some an additional pipe cleaner to the side of the center for structure and to outline the body.
- Add some loops over the top to further outline the body, making it 3 dimensional, and one loop to the back as the start of the tail/stinger.
- To make the tail/stinger, put 4 pipe cleaners in a row and hold firmly an inch or so from one end, pinch together and tie a small length of pipe cleaner around the pinched portion to keep it tightly pressed.

- Continue down the length of the pipe cleaners, pinching in regular intervals and adding a tie until you get near the end. When you run out of space cut the ends off 3 of the 4 pipe cleaners, leaving one to remain. The single pipe cleaner left will be the stinger of the tail so curl that around to give it the proper shape.
- Bend this tail slightly backwards to get close to the final shape. For further detail, make some little red “staples” that will be insert into the middle 2 pipe cleaners of each bulb in the tail.
- Attach the tail with the free pipe cleaners at the end so that it lines up with the loop that was attached to the back of the body easier on in step 4.
- To make the front arms, bend two pipe cleaners in half and put them together with the rounded end on the same side. Twist until you are about 1 inch from the end to leave some free pipes to attach to the body later.
- To make the claws, start with a small circle and add on to it to create a rough claw outline. Add to this outline to create the pinchers and add color as desired.
- Attach the arms to the front of the body by making use of the 4 untwisted ends of pipe cleaner on each arm.
- To add some color and structural integrity to the arms, wrap red pipe cleaners around the base of each where they connect to the body. Wrap them tightly to ensure the arms are not wobbly. They need to support the claws, which are going to be heavy.

- Attach the claws to each arm by attaching a pipe cleaner to the cirular part of the claw, then around the arm, then attach back to the circular part of the claw, and back around the arm etc. until it is secured enough. Wrap additional black or red pipe cleaners around the arm near the claw to give it a cleaner transition.

- Finish the body by adding alternating loops of red and black pipe cleaners to the black ones already there. Slowly taper the ends with shorter loops to transition from body to tail, and body to head.
- Bend the legs up and then create the articulation of the multiple knees and feet to get it to stand on its own.
That’s it. If you want to ad a bit more coloring to make it really pop, go for it. Here are some additional pictures of the final product.


This is so complicated. I really wanted to make this. It is frustrating wish the picture had labels.
LikeLike
This is too hard
LikeLike